🎉 JointJS has new documentation! 🥳
🎉 JointJS has new documentation! 🥳
The Print plugin prepares a paper for printing and initiates printing using the browser print wizard.
print(paper, [options]) - prints the paper using the browser print dialog box.Where
paper is an instance of dia.Paper and
options is an object with the following possible values:
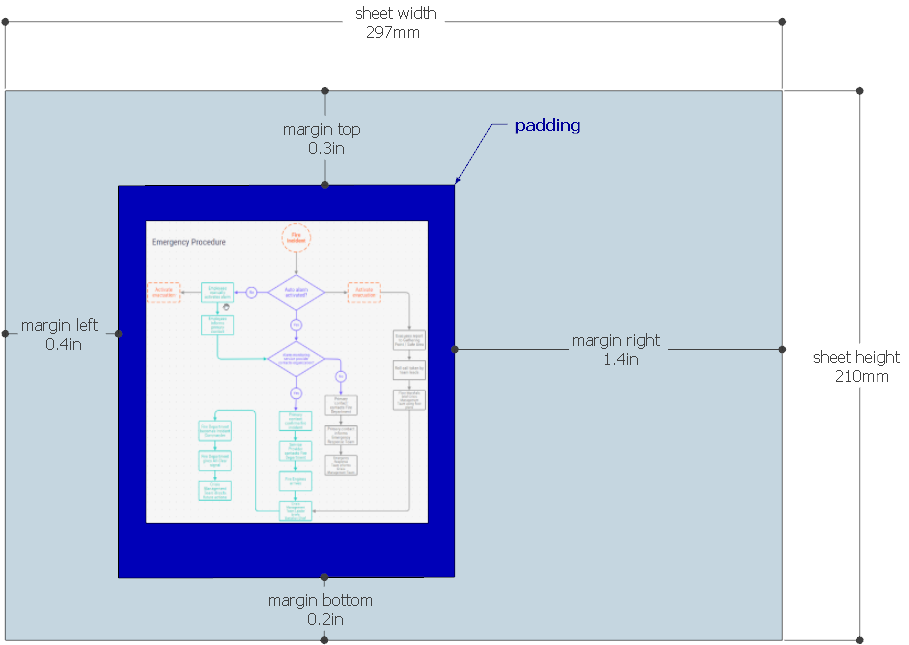
| sheet | object | Optional. Along with the sheetUnit, margin and marginUnit it defines the
output paper. sheet could be specified as an object: { width: [number], height: [number] }. It
defaults to size of the A4 - 210x297. This option
also sets the page orientation - landscape or portrait. For example A4 - landscape would be set as {
width: 297, height: 210 }
.
Example: 
Please note, the |
|---|---|---|
| sheetUnit | string | Optional. Size unit for the sheet option. Supported units are mm, cm,
in, pt, pc. It defaults to mm
|
| area | object |
Optional. Custom area to be printed. Defined as {width: [number]: height: [number], x: [number], y:
[number] }. If the area is not defined, the whole graph is printed.
|
| ready | function | Optional. This callback function is triggered when the print content is ready for the actual print. At this moment it's possible to update the print content element (e.g. set some additional css styles) and pass this through. Or, it's also possible to cancel the print process. The prepared print content is a HTML element (multiple elements in case of the poster option). To cancel the print process pass falsy value into the readyToPrint callback (see the example below). This is useful if you need e.g. add a watermark or have a custom print preview UI widget.
|
| poster | boolean | object | Optional. Splits the area to be printed to pieces. Each piece will be printed on a separate page. poster can be defined either as { rows: [number], columns: [number] } or as { width: [number], height: [number] }. The first option (rows/columns) is a "table-style". It treats the print area to be a table and it divides it to defined amount of rows and columns. The width/height variant allows you to define the width and height of the piece. It defaults to false. |
| margin | number | object | Optional. The space on all sides of the paper area to be printed. The margin could
be also an object with the following properties for finer grained control of the margin on each side:
{ left: [number], top: [number], right: [number], bottom: [number] } |
| marginUnit | string | Optional. Size unit for the margin option. Supported units are mm, cm,
in, pt, pc. It defaults to in
|
| padding | number | object | Optional. This is applicable only if the option area is not set - when the whole graph is
printed. It's an extra space added to each side of the graph. The padding could
be also an object with the following properties for finer grained control of the padding on each side:
{ left: [number], top: [number], right: [number], bottom: [number] } |
Include print.css and joint.format.print.js files into your HTML:
<link rel="stylesheet" type="text/css" href="print.css">
<script src="joint.format.print.js"></script>document.getElementById('print-btn').addEventListener('click', function() {
joint.format.print(paper, {
padding: 10,
sheet: { width: 297, height: 210 },
poster: false,
margin: 1,
marginUnit: 'in',
ready: function(printAreaElements, readyToPrint) {
printAreaElements.forEach(function($el) {
$el.find('#paper').css('border', 'none');
});
readyToPrint(printAreaElements)
}
});
}, false);
If you'd like to add your custom text or logo to all the printed papers, you can use the following method in your CSS:
@media print {
    body:before {
       content: 'My Cool Company';
       top: -5mm;
    }
}
This adds the text My Cool Company to the top of the printed document. For adding a logo image, just set
width, height and background-image properties on the :before
pseudo-element.