🎉 JointJS has new documentation! 🥳
🎉 JointJS has new documentation! 🥳
Business Process Model and Notation (BPMN) is a graphical representation for specifying business processes in a business process model. Along with the BPMN specification, an XML schema is also defined that allows a BPMN diagram to be exported to XML.
This package enables the export process within the JointJS+ framework.
Include joint.format.bpmnExport.js file into your HTML:
<script src="joint.format.bpmnExport.js"></script>
<script>
    const exportResult = joint.format.toBPMN(paper);
</script>
Or place the plugin installable package in your project. The following package.json example places
the package in the root of the project. Next, run npm install to install the dependency.
{
    "dependencies": {
        "@joint/format-bpmn-export": "file:joint-bpmn-export.tgz", // path to file
    }
}
The plugin can then be imported into your code as follows:
import { toBPMN } from '@joint/format-bpmn-export';

const exportResult = toBPMN(paper);There are only a few core concepts to understand when working with this package.
toBPMN(paper, options = {}) functionThis function handles the export process. It takes a joint.dia.Paper containing a diagram and optionally the options object. The
inclusion of the parameter provides the flexibility to customize the export process to meet specific requirements.
It is an object with the following properties:
| exportableObjectFactories |
A collection of exportable object factories mapped by shape types. Each exportable object factory is a function that gets a cell view as a parameter and is expected to create and return an exportable object, or
|
|---|
If the export engine worked directly with joint.shapes.bpmn2, there would be little room for customization. That's why the concept of
exportable objects comes into play.
In the first step, each cell in the diagram is converted into a corresponding exportable object that encapsulates all the information necessary for subsequent serialization into the desired XML fragments. And then, in the next step, the engine gets the XML fragments generated and assembles them all into the final XML result.
This concept introduces a high degree of flexibility. In particular, there's no requirement to use only shapes from joint.shapes.bpmn2. In
essence, any entity that can be transformed into a corresponding exportable object can be seamlessly integrated into the process. This allows working with
custom shape implementations for selected BPMN elements. Alternatively, shapes from joint.shapes.bpmn2 can be used, but their processing can be
further customized.
These ideas will be further explored and elaborated in the following examples.
The engine recognizes the following exportable objects and their properties and methods:
| Exportable object | Properties | Methods |
|---|---|---|
| Activity |
|
|
| Flow |
|
|
| Event |
|
|
| Gateway |
|
|
| DataAssociation |
|
|
| Annotation |
|
|
| AnnotationLink |
|
|
| Group |
|
|
| Pool |
|
|
| DataObject |
|
|
| Interface | Definition |
|---|---|
| Lane |
|
There must be something that can convert a BPMN shape element (one from joint.shapes.bpmn2 or a custom one) into a corresponding exportable
object. This piece of the puzzle is called an exportable object factory. It's essentially a function designed to create a specific exportable
object from a given BPMN shape element.
Each shape element is intended to be processed by a dedicated factory, and this factory can be either one of the default factories or a completely custom implementation.
There is a set of predefined default factories that cover the shapes from joint.shapes.bpmn2. However, any of these defaults can be overridden
in the export options object using the exportableObjectFactories property. This flexibility allows users to customize the exportable object
creation process to their specific needs and requirements.
When implementing a custom exportable object factory, the exportable object can either be created from scratch, or the default factory (if one exists for the
cell type being processed) can be used to create an object base, and then further customization can be performed. If the default factory exists, it is
passed as a second parameter called defaultFactory, which can be invoked.
The most basic way to use the package is to convert a paper with a diagram to XML without using an options parameter. It's as simple as
calling toBPMN with the paper as a parameter.
const exportResult = toBPMN(paper);

// exportResult.cells instanceof XMLDocument
Sometimes only a subtle adjustment is needed in the XML result. For example, when using the bpmn2.Event shape, and the desire is to have the
label in uppercase in the XML result.
In such case, the solution is to refine the value of the label property within the corresponding exportable object. This customization can be
done in a custom exportable object factory registered for the bpmn2.Event element type. Once implemented, the resulting XML fragment will
display the label in uppercase.
const exportResult = toBPMN(paper, {
    exportableObjectFactories: {
        'bpmn2.Event': (cellView, defaultFactory) => {
            const exportableObject = defaultFactory();

            exportableObject.label = exportableObject.label.toUpperCase();

            return exportableObject;
        }
    }
});
Sometimes the shapes available in joint.shapes.bpmn2 may not cover all the needs of a project. In such case, it is necessary to define
custom shapes. To include these custom shapes in the export process, it is further necessary to define custom exportable object factories. Each of these
factories is responsible for converting a specific custom shape into the corresponding exportable object.
const CustomShape = joint.shapes.bpmn2.Activity.define(
    'CustomShape'
);

const customShape = new CustomShape({
    position: {
        x: 10,
        y: 10,
    },
    attrs: {
        label: {
            text: 'Custom shape'
        }
    }
});

paper.model.addCell(customShape);

exportResult = toBPMN(paper, {
    exportableObjectFactories: {
        'CustomShape': (cellView, defaultFactory) => {
            return new exportableObjects.Activity(cellView, 'task', [], cellView.model.attr('label/text'));
        }
    }
});
Another way to customize the export process is to extend the predefined exportable objects.
There is an extensionElement element defined in BPMN XML that allows the embedding of custom, BPMN-independent information.
Each exportable object contains methods that return XML fragments, and the creation of these fragments can be fully customized. In the following example, the
creation of the process element is extended by generating an additional extensionElement with a nested myCustomInformation element
from a non-BPMN
namespace.
class CustomExportableActivity extends exportableObjects.Activity {
    toTaskXMLElement() {
        const taskXMLElement = super.toTaskXMLElement();

        const exampleNamespace = 'http://www.example.org';

        taskXMLElement.setAttribute('xmlns:example', exampleNamespace);

        const extensionElements = document.createElementNS('http://www.omg.org/spec/BPMN/20100524/MODEL', 'extensionElements');

        extensionElements.appendChild(document.createElementNS(exampleNamespace, 'example:myCustomInformation'));

        taskXMLElement.appendChild(extensionElements)

        return taskXMLElement;
    }
}

exportResult = toBPMN(paper, {
    exportableObjectFactories: {
        'bpmn2.Activity': (cellView, defaultFactory) => {
            const exportableObject = defaultFactory();

            return new CustomExportableActivity(
                cellView,
                exportableObject.type,
                exportableObject.markers,
                exportableObject.label
            );
        }
    }
});
The BPMN 2 domain is large and the export plugin doesn't cover it all yet.
Business Process Model and Notation (BPMN) is a graphical representation for specifying business processes in a business process model. Along with the BPMN specification, an XML schema is also defined that allows a BPMN diagram to be imported from XML.
This package enables the import process within the JointJS+ framework.
Include joint.format.bpmnImport.js file into your HTML:
<script src="joint.format.bpmnImport.js"></script>
<script>
    const importResult = joint.format.fromBPMN(xmlDoc);
</script>
Or place the plugin installable package in your project. The following package.json example places
the package in the root of the project. Next, run npm install to install the dependency.
{
    "dependencies": {
        "@joint/format-bpmn-import": "file:joint-bpmn-import.tgz", // path to file
    }
}
The plugin can then be imported into your code as follows:
import { fromBPMN } from '@joint/format-bpmn-import';

const importResult = fromBPMN(xmlDoc);There are only a few core concepts to understand when working with this package.
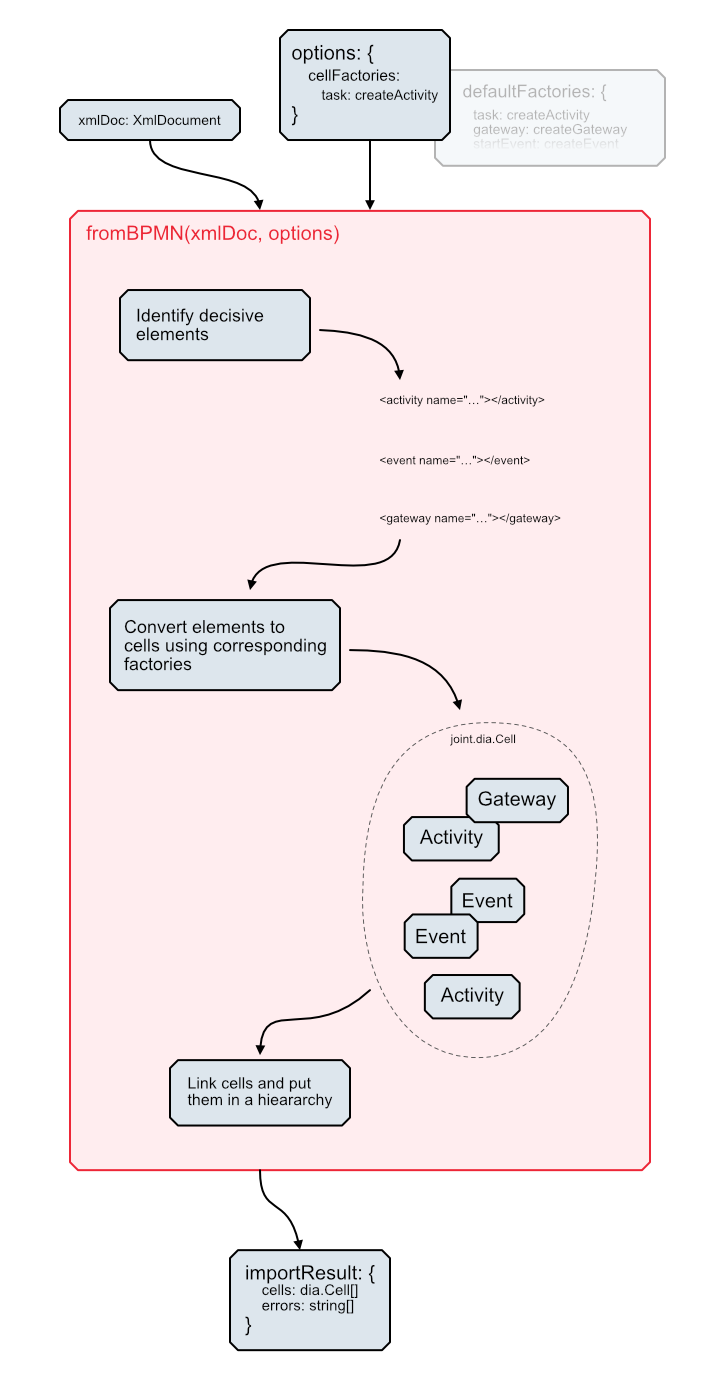
fromBPMN(xmlDoc, options) functionThis function handles the import process. It takes an XMLDocument containing a diagram and an options object. The inclusion of the options
parameter provides the flexibility to customize the import process to meet specific requirements.
The function returns a result object with the following properties:
|
An array of JointJS cells representing the imported BPMN diagram. |
|---|---|
|
An array of errors that occurred during the import process. |
It is an object with the following properties:
| cellFactories |
A collection of cell factories mapped by decisive XML elements. Each cell factory is a function that gets an XML representation of a particular BPMN element as a parameter and is expected to create and return
a corresponding JointJS cell, or |
|---|---|
| bpmn2Shapes |
A namespace that contains definitions of the JointJS BPMN 2 shapes. The following classes are expected to be defined in the given namespace:
|
The input XML document is made up of many XML elements in a hierarchy, and the first task that the import engine performs is to look for so-called decisive elements. Decisive elements are the main elements that represent BPMN shapes. The following is a list of such elements that are recognized by the import engine:
participanttaskserviceTasksendTaskreceiveTaskuserTaskmanualTaskbusinessRuleTaskscriptTasksubProcesscallActivitystartEventintermediateThrowEventintermediateCatchEventboundaryEventendEventgatewayparallelGatewayinclusiveGatewaycomplexGatewayeventBasedGatewayexclusiveGatewaysequenceFlowmessageFlowdataObjecttextAnnotationassociationOnce some decisive element is identified, the next step is to convert it into a corresponding JointJS cell. The piece of the puzzle responsible for this conversion is called a cell factory.
It is a function that takes an xmlNode as input and returns a joint.dia.Cell instance representing that element in the JointJS
world:
(xmlNode: Element, xmlDoc: XMLDocument, defaultFactory: DefaultFactory) => joint.dia.Cell | null
But not only does it take an xmlNode at the input. It takes the whole XMLDocument as a second argument. The reason for this is that
the information needed
to construct an element may be spread over several places in the XML document, and the function needs to be able to look up all the pieces.
If the function returns null, then the processed element is completely excluded from the import.
There is a set of default cell factories predefined in the package, converting decisive elements to the shapes from the namespace specified in the bpmn2Shapes
property within the import options object. These factories can be accessed through the defaultFactory argument in custom cell factories, as
demonstrated in the
examples below.
An important thing to know is that the factory should only take care of the cell itself. Things like embedding it in a hierarchy (as in the case of some subprocesses) or linking it to other cells, these are all tasks that will be done by the import engine once the cell is returned from the factory.
The most basic way to use the package is to convert an XMLDocument into JointJS cells by passing the document to the fromBPMN
without specifying value of
the cellFactories property in the options object.
The resulting cells are stored in the cells property of the import result object.
const importResult = fromBPMN(XMLDocument, {
    cellNamespace: joint.shapes.bpmn2
});

// graph.addCells(importResult.cells)
Providing a custom cell factory is a way how to customize the JointJS cell creation process. For example, it may happen that the cell created by a default factory is fine, but it needs to be refined a bit before being used in the diagram.
Let's take a look at the example where the goal is to have all common tasks with a light pink background. There is no way how to express the fill color in BPMN XML, but it can be defined on the JointJS cell. The way to achieve this is to define a custom cell factory that will let the default factory create a cell base and then just adjust the fill color as desired.
const importResult = fromBPMN(xmlDoc, {
    cellFactories: {
        'task': (xmlNode, xmlDoc, defaultFactory) => {
            const cell = defaultFactory();

            cell.attr('background/fill', '#FFDDDD')

            return cell;
        }
    },
    cellNamespace: joint.shapes.bpmn2
});

// graph.addCells(importResult.cells);
Note that using the default cell factory is optional. The cell can be created from scratch in a custom factory, directly using the provided
xmlNode and possibly xmlDoc, including the entire XML.
Sometimes the shapes available in joint.shapes.bpmn2 may not cover all the needs of a project. In such case, it is necessary to define
custom shapes. To engage these custom shapes in the import process, it is necessary to define a custom cell factory that returns a custom shape instead of
one from the joint.shapes.bpmn2 package.
Note that, as in the previous example, a default cell factory can be used, but again it is optional and the cell of the custom type can be created from
scratch using xmlNode and possibly a xmlDoc directly.
const CustomShape = shapes.bpmn2.Activity.define(
    'CustomShape'
);

const importResult = fromBPMN(xmlDoc, {
    cellFactories: {
        'task': (xmlNode, xmlDoc, defaultFactory) => {
            const cell = defaultFactory();

            return new CustomShape({
                id: cell.id,
                position: cell.position(),
                size: cell.size(),
                attrs: cell.attr()
            });
        }
    },
    cellNamespace: joint.shapes.bpmn2
});

// graph.addCells(importResult.cells);
When implementing a custom cell factory, it may happen that some information, which is outside of the provided xmlNode, is needed. To make it
accessible, a second parameter called xmlDoc is provided. It contains the entire XML document that is currently being imported.
In the following example, the default factory is not used. So all the cell related information has to be collected manually. Normally this would not be possible without the access to the entire XML document.
const importResult = fromBPMN(xmlDoc, {
    cellFactories: {
        'task': (xmlNode, xmlDoc) => {
            const elementId = xmlNode.getAttribute('id');

            const shapeXMLElement = xmlDoc.querySelector(`BPMNDiagram BPMNShape[bpmnElement=${elementId}]`);
            if (shapeXMLElement === null) {
                return null;
            }

            const bounds = shapeXMLElement.querySelector('Bounds');
            if (bounds === null) {
                return null;
            }

            const x = bounds.getAttribute('x');
            const y = bounds.getAttribute('y');
            const width = bounds.getAttribute('width');
            const height = bounds.getAttribute('height');

            if (x === null || y === null || width === null || height === null) {
                return null;
            }

            const name = xmlNode.getAttribute('name') || '';

            return new Activity({
                id: elementId,
                position: {
                    x: parseFloat(x),
                    y: parseFloat(y),
                },
                size: {
                    width: parseFloat(width),
                    height: parseFloat(height),
                },
                attrs: {
                    label: {
                        text: name
                    }
                }
            });
        }
    },
    cellNamespace: joint.shapes.bpmn2
});

// graph.addCells(importResult.cells);
The BPMN 2 domain is large and the import plugin doesn't cover it all yet.